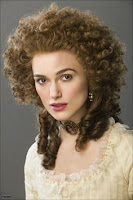
After styling an 18th century wig for the first time last year, I wanted to give it another go and make myself another. I decided this time I wanted to try the hedgehog style. I had a look through the pictures I have saved of the style for inspiration, as it can vary a bit and settled on something like the images below. I also decided I wanted to make it in pink, as coloured hair powders were actually a thing back then and I thought it would be fun. Plus it would be a little ode to the 2006 Marie Antoinette film. This blog will take you through my process step by step. I'm not an expert in wigs or wig styling, but have picked up a few tips and techniques from my drag and cosplay friends and I hope you find this helpful!
For this you will need:
- Long, nice quality lacefront wig
- Styling wig head
- Pins
- Foam rollers
- Wig stand
- Strainer, colander or sieve
- Boiling water
- Rat tail comb
- Baby powder & powder puff or brush
- Hair pins
- Bobby pins
- Scissors to cut the lace
- Starch spray
- Metal hair sectioning clips
Finding the right wig:
I can't stress enough that it's of the utmost importance that you have a good quality wig. I've seen far toom many gorgeous 18th century outfits marred by horribly cheap looking shiny pre-styled wigs.
Firstly, your wig should be lacefront, we want to give the illusion we've styled our actual hair; a hard front to your wig is jarring and distracts from your outfit, and generally just looks bad (unless your going for judge-core).
 |
| We want to avoid our wigs looking like this |
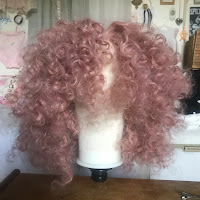
My next piece of advice is you should probably avoid a white wig; your instinct might be to choose a wig that is white as you most often see white hair in 18th century portraits, however the whiteness was created by the powder added to hair and not the hair itself, and most hair is more grey looking than a stark white. I would recommend a natural hair colour, though if you do want to go for an unnatural colour (as coloured hair powders were a thing as you can see in the portraits above), pick something a bit muted rather than anything too bright and vibrant.
 |
| This is the wig I bought |
Also, don't get one with darker roots or an ombre! It's a popular style of wig these days but we want to avoid it, after all the hair would have been powdered everywhere, especially the roots.
Of course, you don't have to follow these tips, they're just my advice for the best results in my opinion~
Styling the wig:
The very first thing I did was put my wig on the styling wig head, and pin it down at the lace.
I started by taking my comb and using the tail to separate sections of the hair, doing a few at a time and keeping them separate with clips. I rolled each section with a foam roller, staring at the front top and working my way back, and secured them in place just by twisting them as you can see in the photo below. I made sure to keep the curls symmetrical. Since I wanted the bottom back of the hair to be longer than the rest, I didn't secure them as high up.
Once all the rollers were in, I took the wig to the shower and put it in a strainer; I wet the wig while I boiled the kettle. Once the kettle was boiled, I poured the boiling water over the wig, making sure to get every spot wet. I boiled a little extra water for good measure. The boiling water is what's going to set the curls. It's important to avoid using a curling iron as that would melt the synthetic hair.
Next I left the wig to dry in the rollers on a wig stand that would let the air flow. I left it until the next day, by which time most of it was dry other than the bottom 4 curls, so I used a hairdryer to dry them a bit faster (you could also just leave the wig longer if you're more patient than me).
Once the wig was completely dry, it was time to remove the rollers. As you can see the wig now had some amazing sausage curls. I kept the back bottom 4 in the curlers so they didn't get mixed up with the rest of the wig. Those 4 at the back will eventually make the longer part of the hairstyle.
Once all but the back 4 ringlets were free, one by one I separated the sausage curls out until they were bouncy and fluffy.
Next I took a few sectioning clips to keep each side of the hair separated, as it was so fluffy it was easy to lose the front. I added a small amount of baby powder at the "roots" of the wig for a little extra help with the grip and texture, and a small amount of delusion that it totally looks more powdery.
At this point I took sections of the wig and pinned it up, making sure the hair pins and bobby pins went through the base of the wig. It might take you a few tries to get it to look right, my wig didn't look great the first time so I removed the pins and started over. On my second try, I twisted the sections of curls a little. You want to make sure it looks even and there are no gaps, and no places where the curls look too taut or where a lock of curls just hangs limply. You also want to make sure your hair & bobby pins aren't too obvious in the wig.
 |
| This was my first attempt at pinning, which you can see didn't turn out great. Below was my 2nd attempt |
Once I'd pinned the top section in a way I was happy with it was time to get started on the long curls at the back. I took out the foam rollers, making sure to be more careful than I was with the other sections. Once they were in their perfect little sausage curls, I separated each ringlet a little bit, though not as much as I had for the top section as I wanted to keep it separate and distinct.
And that's the wig done for the most part! You can wear the long bit down or in a ponytail. I tried a ponytail for the photos below but decided to go with keeping it down on the day I wore it. Now comes the last few steps. Give the wig a slight spray with starch spray, making sure there are no visible globules left on the strands. The starch spray basically acts as your hairspray. Hairspray doesn't work on synthetic hair the way it does on human hair which is why we're using starch spray.
Before wearing you'll need to cut the lace. Basically, make sure you have your hair away in your wig cap and put your wig on, making sure it's the correct tightness (adjust if needed). Take your scissors- smaller are best- and cut in a slight zig zag around the hairline. I fully recommend you look up a video tutorial to follow when cutting
You can see more of me wearing the wig in this blog post~
How to put on a wig:
If you haven't worn a wig before, here's a few tips.
First you want to put your hair up, if it's short then just pin it in place. If it's long then part your hair down the middle and plait each side directionally so it goes round the back/top of your hair; if you have thick hair then separate each side into two so you end up with 4 plaits. Pin everything in place so it won't slip.
Next put your wig cap on. Make sure it isn't too tight for you as you'll probably be wearing it all day. Pin that in place too if you like.
Now with big wigs like this one I like to wear a wig headband, which helps keep the wig in place. You could also go for wig tape if you prefer, though I wouldn't recommend if you have a net type wig cap.
Then make sure your wig is the correct tightness for you There are straps inside with little loops for you to adjust how tight it will be. Now put your wig on, pin where needed (make sure the bobby pins aren't visible), and glue the hairline down with wig glue.
Then make sure your wig is the correct tightness for you There are straps inside with little loops for you to adjust how tight it will be. Now put your wig on, pin where needed (make sure the bobby pins aren't visible), and glue the hairline down with wig glue.


A fun and detailed guide that brings the iconic 18th-century hedgehog wig back to life!
ReplyDeleteSpellbound Wigs LLC